Have you ever wondered how to test a microphone with a multimeter? Whether you are a musician, sound engineer, or simply someone who wants to troubleshoot microphone issues, this article will provide you with a step-by-step guide on how to effectively test a microphone using a multimeter. From understanding the basic functions of a multimeter to measuring the impedance and continuity of your microphone, you will learn everything you need to know to ensure that your microphone is working properly. So, grab your multimeter and let’s get started on this exciting journey of microphone testing!

Table of Contents
Preparing the Equipment
Before you begin testing your microphone with a multimeter, it’s important to gather the necessary tools. You will need a multimeter, which is a measuring instrument used to measure electrical parameters. Ensure that your multimeter is in working condition by checking the battery and making sure it is properly calibrated. This will ensure accurate readings throughout the testing process.
Understanding Microphone Connections
Microphones can have different types of connections, such as XLR, TRS, or USB. It’s important to understand the type of connection your microphone has before proceeding with the testing. Each type of connection will require a different approach when testing with a multimeter. Additionally, you need to identify the positive and negative terminals of the microphone. This information is typically mentioned in the microphone’s user manual or can be found online.
Selecting the Proper Multimeter Settings
When testing a microphone with a multimeter, it’s crucial to select the appropriate settings on your multimeter. There are typically two main settings to consider: voltage mode and ohm mode. Voltage mode is used to measure the voltage output of the microphone, while ohm mode is used to measure the resistance or continuity of the microphone circuit. For testing the voltage output of your microphone, you will need to set the multimeter to DC voltage mode.
Testing for Signal Voltage
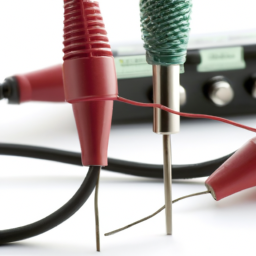
To test the voltage output of your microphone, you will first need to disconnect it from any devices or audio equipment. This ensures accurate readings and eliminates any interference. Once the microphone is disconnected, connect the multimeter probes to the positive and negative terminals of the microphone. Make sure the probes are securely connected to the terminals to avoid any false readings. Finally, turn on the microphone and read the voltage output on the multimeter display.

Assessing Microphone Continuity
Continuity refers to the unbroken flow of an electrical circuit. To test the continuity of your microphone, switch the multimeter to ohm mode. Touch the multimeter probes to the positive and negative terminals of the microphone and observe the multimeter reading. A reading close to zero or displaying a low resistance indicates good continuity, whereas a high resistance or no reading at all suggests a break in the circuit.
Measuring the Resistance
Resistance is a measure of the opposition to the flow of electrical current. To measure the resistance of your microphone, switch the multimeter to ohm mode, just like you did for testing continuity. Connect the multimeter probes to the positive and negative terminals of the microphone and observe the resistance value displayed on the multimeter. A normal microphone typically exhibits a resistance value within a specific range, so compare your reading to the expected range to determine if there are any abnormalities.

Inspecting for Short Circuits
Short circuits can occur when an electrical current bypasses its intended path and takes a shortcut, often resulting in damage to the equipment. To check for short circuits in your microphone, connect the multimeter probes to the positive and negative terminals while the microphone is turned off. If the multimeter reading shows very low resistance or zero ohms, it indicates the presence of a short circuit. This may require further inspection or repair by a professional.
Verifying Phantom Power
Phantom power is a method used to provide power to microphones that require it for operation, typically condenser microphones. To verify if your microphone is receiving phantom power, you will need to connect the multimeter to the phantom power source. Set the multimeter to the appropriate voltage mode and carefully connect the probes to the phantom power terminals. The multimeter reading should display the correct voltage specified for phantom power. This confirms if your microphone is receiving the necessary power to function properly.

Testing Microphone Diaphragm
The diaphragm is the sensitive component in your microphone that converts sound waves into electrical signals. To visually inspect the diaphragm, remove any windscreen or pop filter and check for any visible damage or debris. If the diaphragm appears undamaged, you can use the multimeter to test its functionality. Switch the multimeter to ohm mode and carefully touch the probes to the diaphragm terminals. A functioning diaphragm should display a low resistance value, indicating that it is responsive to the electrical current.
Troubleshooting Common Issues
If you encounter abnormal readings during the testing process or notice any unusual behavior from your microphone, there may be potential problems that require attention. Some common issues include low voltage output, inconsistent continuity, high resistance, or no response from the diaphragm. If you are unsure how to interpret the readings or diagnose the problem, it is recommended to seek professional assistance. A qualified technician can provide a more thorough analysis and recommend the necessary steps for repair or replacement.
Remember, testing your microphone with a multimeter can help identify potential problems and ensure its proper functioning. By following the steps outlined in this article, you will have a better understanding of your microphone’s electrical characteristics and be able to troubleshoot common issues. Regular testing can help maintain the quality and performance of your microphone, ensuring that it continues to deliver exceptional sound for your recordings or performances.


Add comment