
 Want to know the easy ways how to collimate binoculars? Then, follow this post and get the job done straight away!
When using binoculars, make sure that the prisms are appropriately aligned within the tubes. Doing so will make them appear clear and not give you a blurred or double image. The lenses should align with the body’s prisms to properly collimate binoculars. It will create one clear image.
When used properly, binoculars are incredibly useful tools. Binoculars are often expensive and have various components that are difficult to remove. The parts themselves are often fragile and prone to getting damaged, making things worse.
If you have an expensive pair of binoculars, it is best to get them repaired by a professional. Doing so could save you some bucks in the future and allow you to avoid buying a new pair. If you use cheap binoculars, then you can try to make them look better by fixing them yourself. However, be aware that this process is not suitable for everyone
Table of Contents
How Do You Know If Binoculars Are Out Of Collimation?
Binocular collimation? You would first determine if the object is in the center by observing a bright star. Then, focus on the right-hand eyepiece and adjust the binoculars to see if there is a displacement. It is a process that involves carefully aligning the prisms on your binoculars so that the images they capture appear in one image.
If your binoculars are not aligned with the rest of your body, the images in front of you will be different. Sometimes, binoculars are too close to collimation. It means that they might not be able to identify the issue correctly. This issue can make it hard to determine if there is a problem with the binoculars. It is crucial to ensure that the binocular adjustment collimation is done before using it again for good viewing results.
Read also: How to Fix Binoculars with Double Vision ? – Prevention Guide and Tips
How Do You Fix Collimation In Binoculars?
Before you start using binoculars, make sure that they are out of collimation. It is very important to avoid getting stuck with a wrong calibration. The collimation screw rotates the prism against the spring clip. If done correctly, it can create a great deal of contrast in the image.
This guide is for people who are new to the process of binocular collimation. If they are still under warranty, then bring them back to the store. They will void their warranty if they are damaged.
Step 1. Locating The Screw
The spring clips are held in place by a pair of binocular collimation screws. The tension of the spring determines the location of the prism. The screws are located under the armor at the end of the barrels. This area is referred to as prism housing.
Also, you may want to look for small, flat head screws that are under the rubber or leatherette coating. If your budget binoculars do not have a flap, then you will need to lift the external coating to expose the eye. Always remember that when looking for a crosshead screw, it is important to make sure that it accepts a flat head screwdriver.
Step 2. Mounting The Binoculars
Once you have exposed the screws, mount your binoculars to the base. It will give you a steady and hands-free setup. When you mount your binoculars, make sure to focus on a stationary object. It is the northern star Polaris. It is important to focus on this star at night because it does not move as much as other stars.
If you are in the southern hemisphere, focus on Sirius instead. The southern hemisphere’s night sky is poor at showing collimation. If you need to do this in the daytime, pick an object that is at least half a mile away.
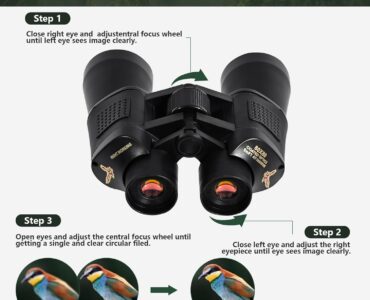
Step 3. One Eye Defocusing
To prevent your eyes from accidentally looking at two different images, focus on one side of the binoculars. If you look at this pair of binoculars for a long time, they can cause headaches and eyestrain. It is a warning that should be taken into account since looking at binoculars for a long time can cause both eyestrain and headaches.
Also, you can change the diopter adjustment angle to focus on one eye without affecting the other one. For instance, adjust it to one eye and place colored cellophane on the objective lens. The trick is that the images are presented as one color. It fools the brain into the conclusion that the two are different.
Step 4. Looking Through The Binoculars
To get the best out of your binoculars, ensure that the interpupillary distance is as wide as it would be if used typically. Use the focus wheel to focus until the image is sharp. If you notice that the star’s sharp image is off-center, it means that the collimation is off.
Step 5. Screw Adjustment
The easiest part of the operation is to turn the binocular adjustment collimation screw. When looking through the binoculars, use a flathead screwdriver. One way to do this is by turning the screws one at a time. While holding the object in your eyes, keep an eye on the image as it is being adjusted. Also, you may need to experiment with the direction of the binoculars to get the best results.
Step 6. Fixing The Coating
You can now put any rubber or coating you lifted back into place after the binoculars were collimated.
Before you start working on the instructions, you should first understand the various terms used for each component:
- Barrel- Two barrels are used for the main part of binoculars. They are long tubes. These components are known as barrels. They make up the main part of binoculars.
- Barrel Bridge- The barrel bridge is a type of bridge that connects two barrels. It has a protruding focus wheel and a hinge.
- Eyepiece- The eyepieces are located on one end of the barrels. The field lens is farthest from the eye, and the ocular lens is closest to it.
- Porro prisms- Porro prisms are two geometric objects that are placed inside the barrels of binoculars. They allow the eyes to see clearly in the correct orientation. Porro prisms are usually identified by their offset barrels. It means that the objects are angled toward the viewer’s eyepiece.
- Roof prisms- Roof prisms are more compact and are usually used instead of two Porro prisms. They are more rugged and are more streamlined.
- Focus Wheel– The focus wheel is a component that is used to control the focus of binoculars. It is usually located on the barrel bridge and can be independently adjusted.
- Diopter Adjuster- The diopter adjuster is a small device that is used to fine-tune the focus of binoculars. It’s designed to compensate for differences in the distance between the eyes.
- Objective Lens- The objective lens is the last component of the binoculars that collects light. It’s usually positioned opposite the barrel of the telescope.
- Hinge- The hinge is located between the barrels. It allows the user to adjust the distance between them to suit their eyes.
Final Thoughts
This process works well by carefully collimating the binoculars according to the distance between the eyes. These will be collimated according to the distance between the pupil and the rest of the ear. They will not work if they are used in the wrong settings. Alternatively, if you’re unsure how to collimate binoculars properly, you can ask for a binocular professional’s help to do the job for you!


Add comment